Build a Self-care Application Using Next.js and Appwrite
Recharge and Revitalize: Your Personal Self-Care Companion - Powered by Next.js and Appwrite
Table of contents
- Prerequisites
- Set Up a Next.js Project
- Setting Up Appwrite
- Configuring Appwrite in Next.js
- Set Up Next.js Routing
- Authentication
- Header Component
- Creating SelfCare Component
- Updating index.js
- Adding More Functionality in Our SelfCare Component
- Styling Our Application
- Adding EncouragingQuotes Component
- Conclusion
- Resources
Self-care is an essential aspect of maintaining overall well-being. In today's fast-paced world, it's important to dedicate time to relax, rejuvenate, and take care of ourselves. In this tutorial, we'll explore how to build a self-care app using Next.js, a popular React framework, and Appwrite, an open-source backend platform that provides authentication, database, and storage services. By the end of this tutorial, you'll have a fully functional self-care app that allows users to create and manage self-care activities.
Prerequisites
Before we begin, make sure you have the following installed:
Node.js (v12 or above)
npm or yarn package manager
Basic knowledge of React and Next.js
Set Up a Next.js Project
Let's create a new directory:
mkdir self-care-app
Then navigate to the project directory using cd self-care-app and run the following command to create a new Next.js project:
npx create-next-app .
Once the project is completed, We can open it in our preferred code editor.
Setting Up Appwrite
Visit the Appwrite website (appwrite.io) and sign up for an account if you haven't already.
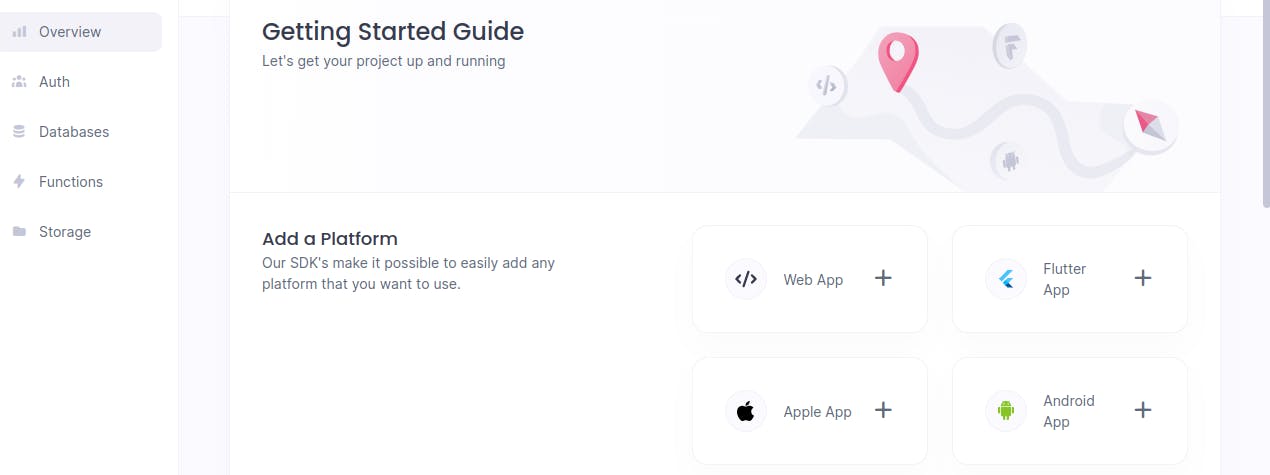
Let's now create a new project in Appwrite:

Then add the web SDK:

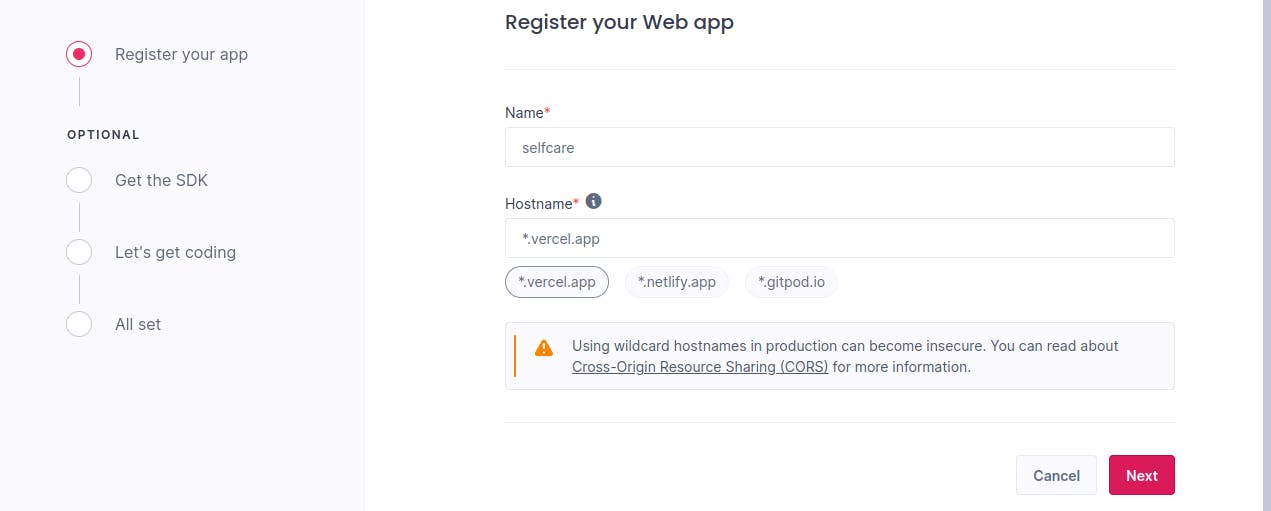
After that, we will register our web app:

Then click next to get the SDK. In the coding part, note down the endpoint and project ID.
Make sure to install the Appwrite JavaScript SDK by running the following command in your project directory:
npm install appwrite
Configuring Appwrite in Next.js
Now, let's configure Appwrite in our Next.js project.
In our Next.js project, let's create a new file called appwrite.js in the root directory. Open the appwrite.js file and add the following code to configure the Appwrite SDK with our endpoint and project ID:
import { Account, Client } from "appwrite";

const client = new Client()
.setEndpoint('YOUR_APPWRITE_ENDPOINT')
.setProject('YOUR_APPWRITE_PROJECT_ID')

export const getUserData = async () => {
  try {
    const account = new Account(client);
    return account.get();
  } catch (error) {
    const appwriteError = error;
    throw new Error(appwriteError.message);
  }
};

export const login = async (email, password) => {
  try {
    const account = new Account(client);
    return account.createEmailSession(email, password);
  } catch (error) {
    const appwriteError = error;
    throw new Error(appwriteError.message);
  }
};

export const logout = async () => {
  try {
    const account = new Account(client);
    return account.deleteSession('current');
  } catch (error) {
    const appwriteError = error;
    throw new Error(appwriteError.message);
  }
};

export const register = async (email, password) => {
  try {
    const account = new Account(client);
    return account.create('unique()', email, password);
  } catch (error) {
    const appwriteError = error;
    throw new Error(appwriteError.message);
  }
};

export default client;
This is a JavaScript module that uses the Appwrite SDK to interact with the Appwrite backend.
Here's a breakdown of what each function does:
getUserData: This function retrieves the user data by making a request to the Appwrite API. It uses thegetmethod of theAccountclass to get the user data.login: This function allows a user to log in by creating an email session with the provided email and password. It uses thecreateEmailSessionmethod of theAccountclass to create the session.logout: This function logs out the user by deleting the current session. It uses thedeleteSessionmethod of theAccountclass to delete the session.register: This function allows a user to register by creating a new account with the provided email and password. It uses thecreatemethod of theAccountclass to create the account.
The client object is an instance of the Client class from the Appwrite SDK. It is used to set the endpoint URL and project ID for the Appwrite API.
The code also exports the client object as the default export of the module, which means it can be imported and used in other files.
Set Up Next.js Routing
Let's delete the app folder and the contents in public folder and then create a new pages folder. In the pages folder create a file named index.js and add the code below:
import Link from 'next/link';

const Home = () => (
  <div>
    <h1>Welcome to the Self-Care App</h1>
    <Link href="/Register" legacyBehavior>
  Register
</Link>
<Link href="/Login" legacyBehavior>
  Login
</Link>

  </div>
);

export default Home;
This is a React component named Home that renders a simple homepage for our self-care app. It uses the Link component from the next/link package to create links for navigating to the registration and login pages.
Start the development server using:
npm run dev
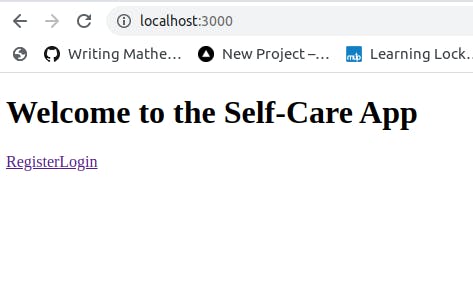
Let's visit http://localhost:3000 in our browser to see the page in action. Here is the result:

Authentication
After that, let's create Register.js, Login.js and Logout.js file in the pages folder.
Registeration File
In the Register.js file, add the following code:
import { useState } from "react";
import { register } from "../appwrite";
import Link from "next/link";

export default function SignUp() {
  const [email, setEmail] = useState("");
  const [password, setPassword] = useState("");

  const handleSubmit = (event) => {
    event.preventDefault();
    if (!email) {
      alert("Email is required.");
      return;
    }

    if (!password) {
      alert("Password is required.");
      return;
    }

    if (password.length < 8) {
      alert("Password must be at least 8 characters long.");
      return;
    }

    register(email, password)
      .then((account) => {
        alert(`Successfully created account with ID: ${account.$id}`);
      })
      .catch((error) => {
        console.error(error);
        alert("Error/A user with the same email exists.");
      });
  };

  return (
    <form className="form" onSubmit={handleSubmit}>
      <div className="form-group">
        <label htmlFor="email">Email</label>
        <input
          id="email"
          type="email"
          value={email}
          onChange={(e) => setEmail(e.target.value)}
        />
      </div>

      <div className="form-group">
        <label htmlFor="password">Password</label>
        <input
          id="password"
          type="password"
          value={password}
          onChange={(e) => setPassword(e.target.value)}
        />
      </div>

      <button type="submit" className="submit-btn">
        Sign up
      </button>

      <Link href="/Login">
        Login
      </Link>
    </form>
  );
}
The code above is a React functional component that represents a sign-up form. Here's a breakdown of what it does:
It imports the necessary dependencies:
useStatefrom the "react" package, which is a React hook for managing state.registerfromappwritemodule for handling user registration.Linkfrom thenext/linkpackage, which is used to create a link to the login page.
Inside the component, there are two state variables,
emailandpassword, initialized using theuseStatehook. TheuseStatehook returns an array with the current state value and a function to update that state value.The component defines a
handleSubmitfunction that will be called when the form is submitted. It prevents the default form submission behavior, validates the input fields, and then calls theregisterfunction with the email and password values.The
registerfunction returns a promise, which is handled using the.thenand.catchmethods. If the registration is successful, an alert is displayed with the account ID. If there's an error, the error is logged to the console, and an alert is displayed.The component renders a form with two input fields for email and password. The values of these fields are bound to the state variables
emailandpassword, respectively, using thevalueattribute and theonChangeevent handler. When the user types in these fields, the state variables are updated.There's a submit button inside the form that triggers the
handleSubmitfunction when clicked.Finally, there's a link to the login page using the
Linkcomponent from thenext/linkpackage. When clicked, it navigates the user to the/Loginpage.
Overall, this component represents a basic sign-up form, with form validation and submission handling.
Login File
Let's create a component that represents a login page in Our application using Next.js. That when the user fills in the email and password fields and submits the form, it attempts to log in the user using the provided credentials and performs the necessary actions based on the login result.
import { useState } from "react";
import { useRouter } from "next/router";
import { login } from "../appwrite";
import Link from "next/link";

export default function LogIn() {
  const [email, setEmail] = useState("");
  const [password, setPassword] = useState("");
  const router = useRouter();

  const handleSubmit = (event) => {
    event.preventDefault();
    if (!email) {
      alert("Email is required.");
      return;
    }

    if (!password) {
      alert("Password is required.");
      return;
    }

    login(email, password)
      .then((account) => {
        alert(`Successfully logged in from: ${account.osName}`);
        router.push("/");
      })
      .catch((error) => {
        console.error(error);
        alert("Login failed. Please try again.");
      });
  };

  return (
    <form className="form" onSubmit={handleSubmit}>
      <div className="form-group">
        <label htmlFor="email">Email</label>
        <input
          id="email"
          type="email"
          value={email}
          onChange={(e) => setEmail(e.target.value)}
        />
      </div>

      <div className="form-group">
        <label htmlFor="password">Password</label>
        <input
          id="password"
          type="password"
          value={password}
          onChange={(e) => setPassword(e.target.value)}
        />
      </div>

      <button type="submit" className="submit-btn">
        Log In
      </button>
      <Link href="/Register">
        Register
      </Link>
    </form>
  );
}
Let's breakdown the above code:
useStatehook: It is used to define state variablesemailandpasswordand their respective setter functions.useRouterhook: It is used to access the Next.js router object.handleSubmitfunction: This function is called when the form is submitted. It first checks if the email and password fields are not empty. If any of them is empty, it shows an alert message. Otherwise, it calls theloginfunction (presumably defined in../appwritemodule) with the provided email and password. If the login is successful, it displays a success message with the operating system name from the returned account object and navigates the user to the homepage ("/"). If there's an error during login, it logs the error to the console and shows an alert message.JSX elements: The component returns JSX elements representing the login form. It includes an
inputfield for email and password, a submit button, and a link to the registration page ("/Register"). ThevalueandonChangeattributes of the input fields are bound to theemailandpasswordstate variables, respectively. TheonChangefunction updates the state variables as the user types.
Logout File
In the pages/components folder add logout.js file and add the following code:
import { useEffect, useState } from "react";
import { useRouter } from "next/router";
import { getUserData, logout } from "../../appwrite";
function Logout() {
const router = useRouter();
const [user, setUser] = useState(null);
useEffect(() => {
getUserData()
.then((account) => setUser(account))
.catch((error) => {
if (router.pathname !== "/Register" && router.pathname !== "/") {
router.push('/Login');
}
});
}, []);
const handleLogOut = () => {
logout()
.then(() => router.push('/Login'))
.catch((error) => console.log("Logout error:", error));
};
if (!user && router.pathname !== "/Register" && router.pathname !== "/") {
return <p>You aren't logged in.</p>
}
return (
<div>
{user && <p>Logged in as {user.email}</p>}
<button onClick={handleLogOut}>Log out</button>
</div>
);
}
export default Logout;
Here's a breakdown of how it works:
The component imports necessary dependencies such as
useEffectanduseStatefrom React, as well asuseRouterfor routing andgetUserDataandlogoutfunctions from an external module (presumably related to authentication).Inside the component,
useRouteris called to get the current router object, which provides access to the browser's location and history.The component defines a state variable
userusing theuseStatehook, initialized asnull. This variable will hold the user data once retrieved.The component uses the
useEffecthook with an empty dependency array[], which means the effect will run only once when the component mounts. Inside the effect, it callsgetUserDatafunction to retrieve user data.If the user data is successfully retrieved, the
setUserfunction is called to update theuserstate variable with the account data.If there is an error retrieving user data, and the current route is not
/Registeror/, the router is used to navigate to the/Loginpage.The component defines a
handleLogOutfunction that will be called when the logout button is clicked. Inside the function, it calls thelogoutfunction to perform the logout action.If the logout is successful, the router is used to navigate to the
/Loginpage.If there is an error during logout, an error message is logged to the console.
Finally, the component renders the UI based on the
userstate and the current route. If there is no user and the current route is not/Registeror/, it displays a message indicating that the user is not logged in. Otherwise, it displays the user's email and a logout button.
Overall, this component checks if the user is logged in and displays the appropriate UI based on the user's authentication status. It allows the user to log out and redirects them to the login page after successful logout.
Header Component
Now create a components folder inside the pages folder and create a header component in the components folder :
// Header.js
import Link from 'next/link';
import Logout from './Logout';

const Header = () => {
  return (
    <header>
      <nav>
        <ul>
          <li>
            <h1>G-Care</h1>
          </li>
          <li>
            <Link href="/" legacyBehavior>
              Home
            </Link>
          </li>
          <li>
            <Link href="/Register" legacyBehavior>
              Register
            </Link>
          </li>
          <li>
            <Link href="/Login" legacyBehavior>
              Login
            </Link>
          </li>
          <Logout/>
        </ul>
      </nav>
    </header>
  );
};

export default Header;
The above Header component represents the header section of the web page and provides a navigation menu with links to different pages. It includes the Logout component to handle user logout functionality.
Adding a Toggle Menu to the Header
Let's add a functional component that defines a header with a menu that can be toggled open or closed. Add the code below in our Header component:
import { useState } from 'react';

const Header = () => {
  const [isMenuOpen, setIsMenuOpen] = useState(false);

  const toggleMenu = () => {
    setIsMenuOpen(!isMenuOpen);
  };
Here's a breakdown of what's happening:
The
useStatehook is imported from the React library. This hook allows functional components to have state.Inside the
Headercomponent, theuseStatehook is used to define a state variable calledisMenuOpenand a function calledsetIsMenuOpento update that state.The initial value of
isMenuOpenis set tofalse, indicating that the menu is initially closed.The
toggleMenufunction is defined to toggle the value ofisMenuOpenwhen called. It uses thesetIsMenuOpenfunction and the logical NOT operator (!) to invert the current value ofisMenuOpen.
This component can be used in other components, such as the login page component, to include the header at the top of the page.
Creating SelfCare Component
In components folder create SelfCareList.js file and add the following code:
import React from 'react';
function SelfCareList({ selfCareItems }) {
  return (
    <div>
      <h3>Self-Care Activities</h3>
      <ul>
        {selfCareItems.map(item => (
          <li key={item.id}>{item.title} - {item.category}</li>
        ))}
      </ul>
    </div>
  );
}

export default SelfCareList;
This code defines a functional component called SelfCareList that renders a list of self-care activities. It expects an array of self-care items to be passed as a prop called selfCareItems. Each item in the array is rendered as a list item (<li>) displaying the title and category of the self-care activity.
Updating index.js
Let's now update the index.js since our header caters to navigation functionality:
import React from 'react';
import Header from '../pages/components/Header';
import SelfCareList from '../pages/components/SelfCareList';


function Home() {
  const selfCareItems = [
    { id: 1, title: 'Take a bubble bath', category: 'Relaxation' },
    { id: 2, title: 'Practice meditation', category: 'Mindfulness' },
    { id: 3, title: 'Go for a walk in nature', category: 'Exercise' },
    { id: 4, title: 'Read a book', category: 'Personal Growth' },
    { id: 5, title: 'Listen to calming music', category: 'Relaxation' },
  ];

  return (
    <div>
      <Header />
      <h2>Welcome to the Self-Care App!</h2>
      <SelfCareList selfCareItems={selfCareItems} />
    </div>
  );
}

export default Home;
Inside the
Homecomponent, an array calledselfCareItemsis defined. It contains several objects representing different self-care activities, each with anid,title, andcategory.The
returnstatement contains the JSX code that will be rendered. JSX is a syntax extension for JavaScript that allows us to write HTML-like code within JavaScript.The JSX code returns a
<div>element that wraps the content of the component.Inside the
<div>, there is a<Header />component that we created earlier.After the
<Header />, there is an<h2>element that displays the "Welcome to the Self-Care App!" text.Finally, there is a
<SelfCareList>component that is passed theselfCareItemsarray as a prop.The component is exported as the default export using
export default Home;. This allows other parts of the codebase to import and use this component.
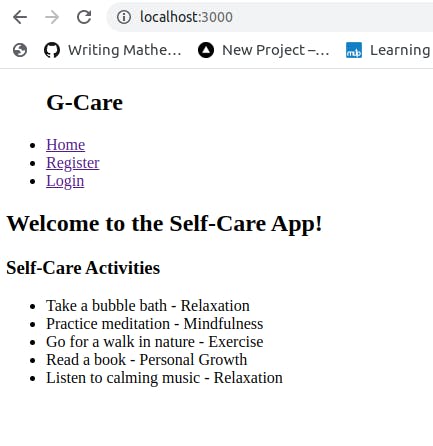
In summary, this code renders a self-care app component that displays a header, a welcome message, and a list of self-care items passed as props to a SelfCareList component:

Adding More Functionality in Our SelfCare Component
Let's include functionalities like item completion, marking all items as completed or incomplete, item selection, deletion, and adding new items to the list. This will provide a more interactive and feature-rich self-care list component compared to the first code snippet.
import React, { useState, useEffect } from 'react';

function SelfCareList({ selfCareItems }) {
  const [completedItems, setCompletedItems] = useState([]);
  const [newItemTitle, setNewItemTitle] = useState('');
  const [newItemCategory, setNewItemCategory] = useState('');
  const [items, setItems] = useState([]);
  const [selectedItems, setSelectedItems] = useState([]); // Add selectedItems state

  useEffect(() => {
    setItems(selfCareItems);
  }, [selfCareItems]);

  const toggleItemCompletion = (itemId) => {
    if (completedItems.includes(itemId)) {
      setCompletedItems(completedItems.filter((id) => id !== itemId));
    } else {
      setCompletedItems([...completedItems, itemId]);
    }
  };

  const toggleAllCompletion = () => {
    if (completedItems.length === items.length) {
      setCompletedItems([]);
    } else {
      const allItemIds = items.map((item) => item.id);
      setCompletedItems(allItemIds);
    }
  };

  const handleNewItemTitleChange = (event) => {
    setNewItemTitle(event.target.value);
  };

  const handleNewItemCategoryChange = (event) => {
    setNewItemCategory(event.target.value);
  };

  const handleAddItem = () => {
    const newItem = {
      id: Date.now(),
      title: newItemTitle,
      category: newItemCategory,
    };

    setItems([...items, newItem]);
    setNewItemTitle('');
    setNewItemCategory('');
  };

  const handleToggleSelected = (itemId) => {
    if (selectedItems.includes(itemId)) {
      setSelectedItems(selectedItems.filter((id) => id !== itemId));
    } else {
      setSelectedItems([...selectedItems, itemId]);
    }
  };

  const handleDeleteSelected = () => {
    const updatedItems = items.filter((item) => !selectedItems.includes(item.id));
    setItems(updatedItems);
    setCompletedItems([]);
    setSelectedItems([]);
  };

  return (
    <div style={{ justifyContent: 'center',textAlign: 'center' }}>
      <h3>Self-Care Activities:</h3>
      <ul>
        {items.map((item) => (
          <li
            key={item.id}
            onClick={() => toggleItemCompletion(item.id)}
            style={{
              textDecoration: completedItems.includes(item.id) ? 'line-through' : 'none',
            }}
          >
            <span onClick={() => handleToggleSelected(item.id)} style={{ cursor: 'pointer' }}>
              {item.title} - {item.category}
            </span>
          </li>
        ))}
      </ul>
      <ul>
      <button onClick={toggleAllCompletion}>
        {completedItems.length === items.length ? 'Mark All Incomplete' : 'Mark All Completed'}
      </button>
      </ul>
      <div>
        <button onClick={handleDeleteSelected} disabled={selectedItems.length === 0}>
          Delete Selected
        </button>
      </div>
      <div>
        <input
          type="text"
          value={newItemTitle}
          onChange={handleNewItemTitleChange}
          placeholder="Enter task title"
        />
        <input
          type="text"
          value={newItemCategory}
          onChange={handleNewItemCategoryChange}
          placeholder="Enter task category"
        />
        <button onClick={handleAddItem}>Add Task</button>
      </div>
    </div>
  );
}

export default SelfCareList;
Here are the key differences of the two SelfCareList components:
State Management: This code snippet uses the
useStatehook to manage the state for various aspects of the self-care list, includingcompletedItems,newItemTitle,newItemCategory,items, andselectedItems. These states are used to handle item completion, adding new items, and selecting and deleting items.Item Completion: The snippet adds the ability to mark items as completed or incomplete. Clicking on an item toggles its completion status, and completed items are displayed with a line-through style.
Mark All Completion: It includes a
Mark All CompletedorMark All Incompletebutton that toggles the completion status of all items.Item Selection and Deletion: The snippet allows users to select multiple items and delete them using the
Delete Selectedbutton.Adding New Items: The snippet adds input fields for entering a new item's title and category, along with an
Add Taskbutton to add the new item to the list.You can delete or keep the header in the
index.js.But I prefer deleting it to leave just the components for simplicity and improving the user flow.
Styling Our Application
First, add the className="horizontal-header in our header component:
<header>
      <nav>
        <ul className="horizontal-header">
This code defines a ul element with the className attribute set to horizontal-header. The className attribute is used to apply CSS classes to an element, allowing for styling and customization.
We can use this CSS code to style our app. Our file is named global.css but you can name it by any name you want. Create a CSS file in our pages folder and add the code.
You can learn more about styling your Next.js file here
After styling our app. Let's import our global.css file to apply it to our code. For that create an _app.js file in our pages directory and add the following code:
import './global.css';

function MyApp({ Component, pageProps }) {

  return <Component {...pageProps} />;
}

export default MyApp;
The imported CSS file is used for global styling across our application.
Adding EncouragingQuotes Component
In the pages/components folder add EncouragingQuotes.js file and add the following code:
import { useEffect, useState } from 'react';

const EncouragingQuotes = () => {
  const [quote, setQuote] = useState('');

  useEffect(() => {
    fetch('https://api.quotable.io/random')
      .then((response) => response.json())
      .then((data) => setQuote(data.content))
      .catch((error) => console.error(error));
  }, []);

  const fetchRandomQuote = () => {
    fetch('https://api.quotable.io/random')
      .then((response) => response.json())
      .then((data) => setQuote(data.content))
      .catch((error) => console.error(error));
  };

  return (
    <div style={{ display: 'flex', justifyContent: 'center' }}>
      <div style={{ textAlign: 'center' }}>
        <h2>Encouraging Quote of the Day:</h2>
        <blockquote>{quote}</blockquote>
        <button onClick={fetchRandomQuote}>Get Another Quote</button>
      </div>
    </div>
  );
};

export default EncouragingQuotes;
This component fetches a random quote from the "api.quotable.io/random" API using the fetch function and displays it on the page.
The useEffect hook is used to fetch a random quote when the component mounts (i.e. when it is first rendered). It takes a callback function as its first parameter and an empty dependency array ([]) as its second parameter. This ensures that the effect is only run once, similar to the componentDidMount lifecycle method in class-based components.
Inside the useEffect callback, the fetch function is used to make a GET request to the "api.quotable.io/random" endpoint. It returns a Promise that resolves to the response object. The response is then converted to JSON format using the response.json() method and the quote content is extracted from the response data and stored in the quote state using the setQuote function.
If there is an error during the fetch request, it will be caught in the catch block and the error will be logged to the console using console.error.
The component returns JSX, which represents the structure and content of the component's rendered output. It includes a heading, a blockquote element to display the quote, and a button to fetch another random quote.
The button has an onClick event handler assigned to the fetchRandomQuote function. This function is similar to the one used in the useEffect hook and fetches a random quote when the button is clicked.
The quote state is interpolated within the blockquote element to display the fetched quote.
The component is exported using the export default syntax, making it available for use in other parts of the application.
Using the EncouragingQuotes Component
Import the component in index.js using:
import EncouragingQuotes from './components/EncouragingQuotes';
Let's add EncouragingQuotes component in our return statement to be used within our Home component, along with a Header component and a SelfCareList component.
return (
    <>
        <Header />
        <EncouragingQuotes />
        <SelfCareList selfCareItems={selfCareItems} />
Visit http://localhost:3000 in our browser to see the self-care app in action. You should be able to add new activities and see them displayed on the page. Deleting activities will also update the list accordingly.
Conclusion
In this tutorial, we've built a self-care app using Next.js and Appwrite. We've utilized Appwrite for user authentication, while Next.js provided us with an efficient and intuitive development framework.
With this foundation, you can further enhance the app by adding more features like user profiles, activity reminders, or progress tracking. Remember to take care of yourself and make self-care a priority in your daily routine. Happy coding and happy self-care!
Resources
Thank you for reading Part 1 of this article. Here is Part 2 , where we dive deeper into "Creating more self-care app components including Calming Sounds in our Appwrite and Next.js app" Here is the github repo to our code
